
Oreo Easter Chicks are a delightful and creative treat that brings joy to any Easter celebration. These fun little chicks made from Oreo cookies are not only adorable but also incredibly easy to make. With their vibrant yellow coating and playful features, they’re perfect for parties, family gatherings, or simply as a fun baking project with kids. Plus, the combination of sweet Oreos and colorful candy melts makes them irresistible!
Why You’ll Love This Recipe
- Quick and Easy: This recipe takes only 20 minutes from start to finish, making it perfect for last-minute treats.
- Kid-Friendly Fun: Get the kids involved! They will love dipping the cookies and adding their own creative touches.
- Versatile Decoration: You can customize your Oreo Easter Chicks with different colors or toppings for various occasions.
- Perfect for Sharing: With 36 servings, these treats are ideal for sharing at gatherings or potlucks.
- Deliciously Sweet: The combination of creamy Oreos and sweet candy melts is sure to please any sweet tooth.
Tools and Preparation
Before diving into this fun recipe, gather your tools. Having everything ready will make the process smooth and enjoyable.
Essential Tools and Equipment
- Baking sheet
- Wax paper
- Microwave-safe bowl
- Spoon or dipping fork
Importance of Each Tool
- Baking sheet: Provides a sturdy base for setting your Oreo chicks. It keeps them organized while they cool.
- Wax paper: Prevents sticking and makes cleanup a breeze. It’s essential for placing your dipped cookies.
- Microwave-safe bowl: Perfect for melting candy melts evenly without burning them. It ensures a smooth coating for the Oreos.
Ingredients
To create these delightful Oreo Easter Chicks, you will need the following simple ingredients:
For the Chicks
- 1-2 bags yellow candy melts
- 1 package double-stuff oreos
- Mini chocolate chips
- Thin pretzel rods (broken into short pieces)
- Orange decorating gel or orange candy melts
How to Make Oreo Easter Chicks
Step 1: Melt the Yellow Candy Melts
Begin by melting the yellow candy melts according to the package directions. Make sure to do this in a microwave-safe bowl to ensure even melting.
Step 2: Dip the Oreos
Once melted, dip each double-stuff Oreo into the yellow candy melts until fully coated. Use a spoon or dipping fork to help with this process if needed.
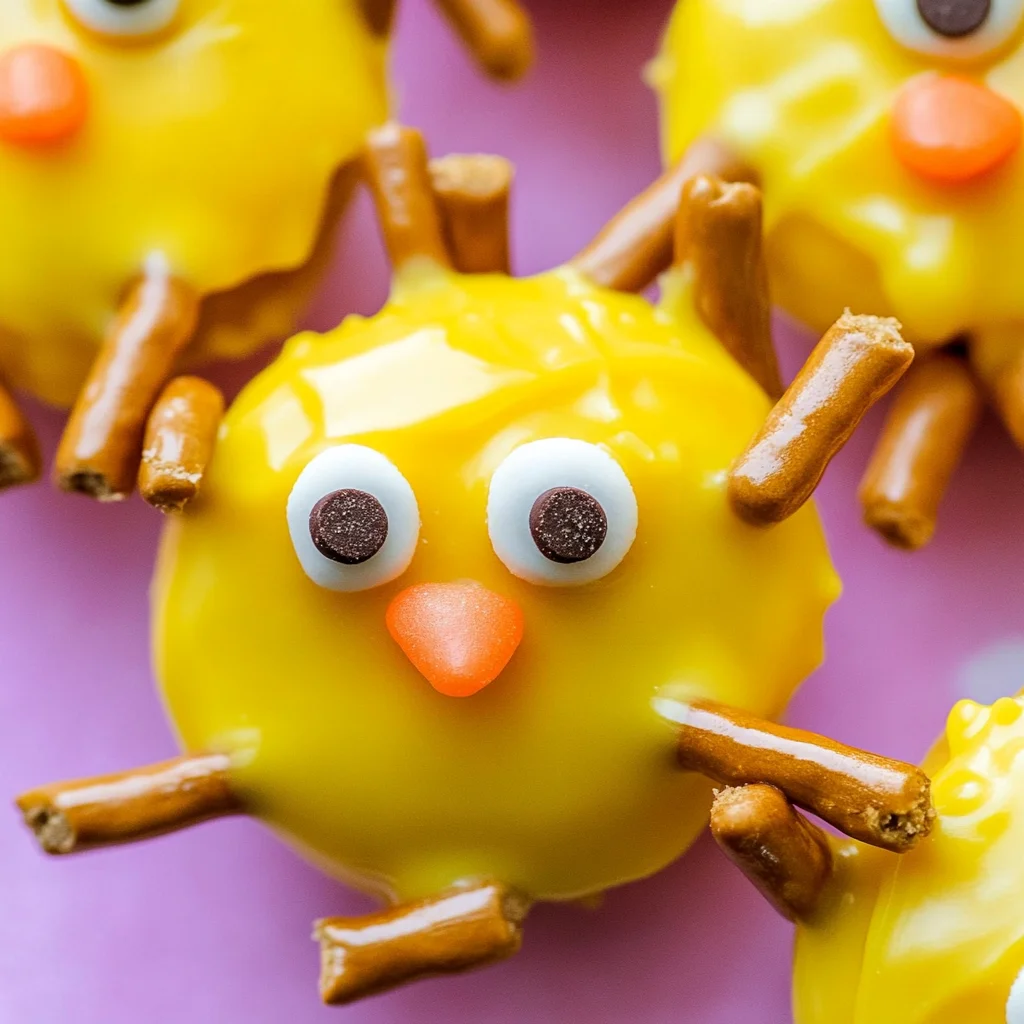
Step 3: Add Legs and Eyes
Place each dipped Oreo on wax paper. Quickly insert two broken pretzel pieces at one end of each cookie to form the legs. Then, add two mini chocolate chips on top of each cookie for eyes.
Step 4: Create Beaks
Using orange decorating gel or melted orange candy melts, carefully draw small triangles on each cookie to create beaks.
Step 5: Chill to Set
Finally, place your decorated Oreo Easter Chicks in the refrigerator for about 10-15 minutes until the candy coating is set.
Enjoy making these adorable treats that are sure to be a hit this Easter!
How to Serve Oreo Easter Chicks
Oreo Easter Chicks are a delightful treat that can be enjoyed in various ways. Whether for a festive gathering or an Easter-themed party, these cute little chicks are sure to please both kids and adults alike.
Fun Presentation Ideas
- Use colorful plates: Brightly colored plates can enhance the visual appeal of your Oreo Easter Chicks.
- Create a themed display: Arrange the chicks on a bed of shredded coconut dyed green to resemble grass.
- Add decorative touches: Sprinkle edible glitter or mini candy eggs around the chicks for extra festivity.
Pairing with Drinks
- Serve with lemonade: A refreshing glass of lemonade complements the sweetness of the chicks perfectly.
- Opt for fruit punch: A fruity punch adds a fun twist and is especially appealing for kids.
Great for Parties
- Set up a dessert table: Showcase your Oreo Easter Chicks as part of a larger dessert spread featuring other seasonal treats.
- Individual servings: Present each chick in a small cupcake liner for easy grab-and-go enjoyment.
How to Perfect Oreo Easter Chicks
To make your Oreo Easter Chicks even more delightful, follow these simple tips. They will help enhance both the appearance and taste of your treats.
- Use fresh ingredients: Ensure your candy melts and cookies are fresh for the best flavor and texture.
- Let cooling time: Allow the melted candy melts to cool slightly before dipping to avoid drips and uneven coating.
- Customize colors: Experiment with different colors of candy melts for unique chick creations beyond just yellow.
- Add personal touches: Use edible markers or sprinkles to create unique expressions on your chick faces.
Best Side Dishes for Oreo Easter Chicks
Serving sides with Oreo Easter Chicks can elevate your snack table, making it even more enjoyable. Here are some great options:
- Carrot Sticks: Fresh carrot sticks provide a healthy crunch that balances out the sweetness of the chicks.
- Fruit Skewers: Colorful skewers filled with assorted fruits add a vibrant touch and refreshing flavor.
- Mini Quiches: Bite-sized mini quiches offer savory goodness that pairs well with sweet treats.
- Cheese Platter: A selection of cheeses adds variety and richness, creating a nice contrast to the sugary desserts.
- Veggie Tray: Crisp vegetables served with hummus or ranch dip encourage healthy snacking alongside sweets.
- Popcorn Mix: A sweet and salty popcorn mix can be an exciting addition, providing different textures and flavors.
Common Mistakes to Avoid
When making Oreo Easter Chicks, it’s easy to overlook some key steps. Here are common mistakes to avoid for a successful treat.
- Not Cooling the Candy Melts: Failing to let the melted candy cool slightly can cause it to be too runny. Allow it to thicken for better coating.
- Skipping the Wax Paper: Omitting wax paper means the cookies might stick to the pan. Always line your baking sheet for easy removal.
- Incorrect Pretzel Placement: Not inserting pretzels deeply enough can lead to legs falling off. Push them in firmly while the candy is still wet.
- Overheating the Candy Melts: Heating candy melts too long can cause them to clump. Use a microwave in short bursts and stir frequently.
- Ignoring Decoration Timing: Decorating too late may result in the candy hardening before adding eyes and beaks. Work quickly after dipping!
Storage & Reheating Instructions
Refrigerator Storage
- Store Oreo Easter Chicks in an airtight container.
- They will last up to 5 days in the refrigerator.
Freezing Oreo Easter Chicks
- You can freeze them for up to 2 months.
- Place them in a single layer in a freezer-safe container with parchment paper between layers.
Reheating Oreo Easter Chicks
- Oven: Preheat to 350°F (175°C) and heat on a baking sheet for about 5 minutes.
- Microwave: Heat one at a time for about 10-15 seconds on a microwave-safe plate.
- Stovetop: Not recommended as this may melt the chocolate decorations.
Frequently Asked Questions
Here are some common questions about making Oreo Easter Chicks.
How do I make Oreo Easter Chicks more colorful?
You can use different colored candy melts or edible glitter to customize their appearance!
Can I use other types of cookies instead of Oreos?
Absolutely! Any sandwich cookie will work, so feel free to experiment with flavors and brands.
How do I store leftover Oreo Easter Chicks?
Store them in an airtight container at room temperature for up to five days or freeze them for longer storage.
Are Oreo Easter Chicks suitable for parties?
Yes! They are fun, festive treats that are perfect for Easter celebrations or any party.
What if I don’t have yellow candy melts?
You can use white chocolate and add food coloring to achieve your desired shade of yellow.
Final Thoughts
Oreo Easter Chicks are an enjoyable and creative treat perfect for any occasion. Their versatility allows for endless customization options, from colors to cookie types. Try making these delightful chicks this Easter season or anytime you want a fun dessert!

Oreo Easter Chicks
- Total Time: 20 minutes
- Yield: Approximately 36 servings 1x
Description
Oreo Easter Chicks are an adorable and vibrant treat that will brighten up any spring celebration. These delightful cookie creations, coated in cheerful yellow candy melts, are perfect for family gatherings or festive parties. Not only are they visually appealing, but they are also incredibly simple to make, making them a fun activity for kids and adults alike. With just a few ingredients and easy steps, you can whip up a batch of these sweet chick-themed treats in no time. Plus, their playful design will bring smiles to everyone at your table!
Ingredients
- 1–2 bags yellow candy melts
- 1 package double-stuff oreos
- Mini chocolate chips
- Thin pretzel rods (broken into short pieces)
- Orange decorating gel or orange candy melts
Instructions
- Melt the yellow candy melts according to the package directions in a microwave-safe bowl.
- Dip each double-stuff Oreo into the melted candy until fully coated, using a spoon if necessary.
- Place dipped Oreos on wax paper and insert two broken pretzel pieces at one end for legs. Add two mini chocolate chips on top for eyes.
- Using orange decorating gel or melted orange candy melts, draw small triangles for beaks.
- Chill in the refrigerator for 10-15 minutes until set.
- Prep Time: 10 minutes
- Cook Time: 10 minutes
- Category: Dessert
- Method: No-bake
- Cuisine: American
Nutrition
- Serving Size: 1 serving
- Calories: 120
- Sugar: 14g
- Sodium: 40mg
- Fat: 6g
- Saturated Fat: 3g
- Unsaturated Fat: 2g
- Trans Fat: 0g
- Carbohydrates: 17g
- Fiber: 0g
- Protein: 1g
- Cholesterol: 0mg